Acknowledgement
The material contained in this web page includes passages which are
verbatim excerpts from two sources: the xxgdb man pages written by
Po Cheung and Pierre Willard and "Debugging with GDB" written by
Richard Stallman and Roland Pesch.
4.5 Debugging Tools: xxgdb and gdb
Presented below is information on how to use a source code debugging
system (the Gnu DeBugger - gdb) and xxgdb, a graphical
user interface to the gdb debugger under the X Window System.
Together these tools provides visual feedback and mouse input for the
user to control program execution through breakpoints, to examine and
traverse the function call stack, to display values of variables and
data structures, and to browse source files and functions.
Gdb has many commands, more than are covered here. For more
information about gdb consult Debugging with
GDB, a reference manual for the gdb debugger.
To use xxgdb the program must be compiled with the g++ compiler
using the "-g" compiler flag set. For example, the command:
g++ -g -o prog prog.cc
compiles the file prog.cc. The "-g" flag causes the compiler to `f
insert information into the executable file (named "prog") that
gdb and xxgdb require in order to work.
Starting xxgdb
To start the xxgdb simple enter its name ("xxgdb") on the
command
line. A graphical display will be presented that looks like this:
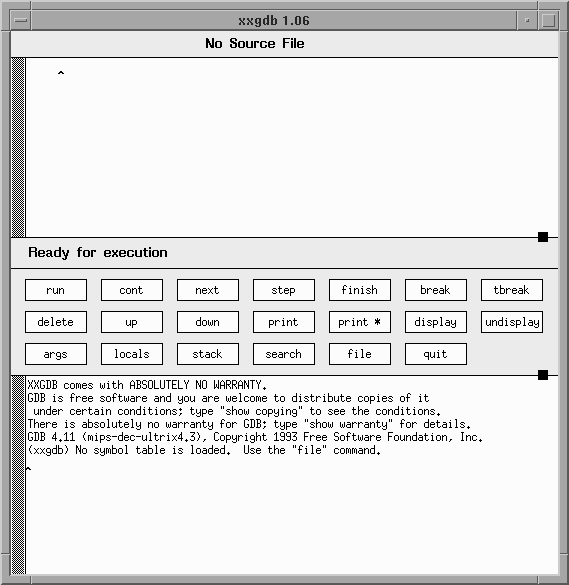
From top to bottom, the xxgdb display consists of the
following
subwindows:
- File Window
- Display the full pathname of the file displayed in the source window,
and the line number of the caret.
- Source Window
- Display the contents of a source file.
- Message Window
- Display the execution status and error messages of xxgdb.
- Command Window
- Provide a list of the common gdb commands which are invoked by simply
clicking the LEFT mouse button.
- Dialogue/Display Window
- Provides a window for displaying output from the program or from
gdb. Alternatively, any gdb command can be entered
in this window.
In the initial xxgdb window above, the File Window current has "No
Source File". During a debugging session the actual name of the source
file being viewed will be shown here. The Source Window in the above
picture is empty. During a debugging session the relevant source code
will appear in this subwindow. The Message Window above has "Ready for
execution." which is the current status of gdb. Other status
information will appear in this place throughout a session. The
Command Window in the middle of the screen has 20 buttons each of
whose function is explained below. The Dialogue/Display window
initially contains the disclaimer message regarding gdb. This
disclaimer begins with the words "GDB comes with...".
The relative sizes of the source window, command window, and the
dialogue/display window can be adjusted by dragging the grip (a small
square near the right edge of a horizontal border) with the LEFT mouse
button down.
Selecting, Searching and Quitting
The command window, in the middle of the xxgdb display,
contains three buttons that are used to begin debugging a file,
quitting xxgdb, and searching through the source code of the
program being debugged. These buttons are:
- file
- Pop up a directory browser that allows the user to move up
and down in the directory tree, to select a text file to
be displayed, to select an executable file to debug, or to
select a core file to debug.Directory entries are marked
with a trailing slash (`/') and executables with a
trailing asterisk (`*'). Filenames beginning with a dot
(`.') or ending with a tilde (`~') are not listed in the
menu.
- quit
- Exit xxgdb.
- search
- Pop up a search panel which allows both forward (>>) and
reverse (<<) search of text strings in the source file.
Hitting carriage return after entering the search string
will begin a forward search and pop down the search panel.
It is important to remember that the file you select for debugging
must be an executable file that has been compiled with by g++ with the
"-g" compiler option.
When xxgdb loads the executable file it will display in the
upper subwindow (the Source subwindow) the source text of the program
being debugged. This subwindow will be scrolled/refreshed during the
execution of the program so that the current line being executed is
always visible. The contents of this window can be searched using the
search button as described above.
Setting Breakpoints
The principal purposes of using a debugger are so that you can stop
your program before it terminates; or so that, if your program runs
into trouble, you can investigate and find out why.
A breakpoint makes your program stop whenever a certain point in the
program is reached. When the program is stopped at a breakpoing, you
may then examine and change variables, set new breakpoints or remove
old ones, and then continue execution. It is often necessary to
eliminate a breakpoint or watchpoint once it has done its job and you
no longer want your program to stop there. This is called deleting the
breakpoint. A breakpoint that has been deleted no longer exists; it is
forgotten.
Breakpoints can be set and deleted using the following buttons in the Command
Window:
- break
- Stop program execution at the line or in the function
selected. To set a breakpoint in the program, place the
caret at the start of the source line or on the
function name and click the break button.
A stop sign will appear next to the source line.
- tbreak
- Set a breakpoint enabled only for one stop. This is the
same as the break button except the breakpoint is
automatically disabled the first time it is hit.
- delete
- Remove the breakpoint on the source line selected or the
breakpoint number selected.
It is not necessary to delete a breakpoint to proceed past it. GDB
automatically ignores breakpoints on the first instruction to be
executed when you continue execution without changing the execution
address.
Controlling the Program's Execution
The program being debugged can be run and, when breakpoints are
encountered, its future execution can be controlled via a set
of buttons in the Command Window. The relevant buttons are:
- run
- Begin program execution.
- cont
- Continue execution from where it stopped.
- next
- Execute one source line, without stepping into any
function call.
- step
- Execute one source line, stepping into a function if the
source line contains a function call.
- finish
- Continue execution until the selected procedure returns;
the current procedure is used if none is selected.
Continuing means resuming program execution until your program
completes normally, experiences an error or reaches a breakpoing. In
contrast, stepping means executing just one more "step" of your
program.
The step button continues running your program until control reaches a
different source line either in the same or a different function. In
contrast the next button Continues to the next source line in the
current function. Similar to step, but any function calls appearing
within the line of code are executed without stopping.Execution stops
when control reaches a different line of code at the stack level which
was executing when the next command was given.
A typical technique for using stepping is to set a breakpoint at the
beginning of the function or the section of your program where a
problem is believed to lie, run your program until it stops at that
breakpoint, and then step through the suspect area, examining the
variables (see below)that are interesting, until you see the problem
happen.
Examining the Execution History
When your program has stopped, at a breakpoint or because it
experienced a fatal error, it is often useful to examine the sequence
of method invocations that have led to the current point of execution
and to examine the arguments and local variables of the current
method. Information such as this is obtained by examining the
"call stack".
Each time your program invokes a method, the information about where
in your program the invocation was made from is saved in a block of
data called a stack frame. The frame also contains the arguments of
the call and the local variables of the function that was called. All
the stack frames are allocated in a region of memory called the call
stack. When your program stops, the GDB commands for examining the
stack allow you to see all of this information. When your program
stops, GDB automatically selects the currently executing frame and
describes it briefly as the frame command does.
GDB assigns numbers to all existing stack frames, starting with zero
for the current frame, one for the frame that called it, and so on
upward. These numbers do not really exist in your program; they are
assigned by GDB to give you a way of designating stack frames in GDB
commands.
Most commands for examining the stack and other data in your program
work on whichever stack frame is selected at the moment. In
particular, whenever you ask GDB for the value of a variable in your
program, the value is found in the selected frame. There are special
GDB commands to select whichever frame you are interested in.
The Command Window contains several buttons for examining the call
stack and its frames. These commands are:
- stack
- Show a stack trace of the functions called.
- up
- Move up one level on the call stack.
- down
- Move down one level on the call stack.
- args
- Print the arguments of the selected frame.
- locals
- Print the local variables of the selected frame.
For the up and down commands it is important to remember
that "up" in the call stack advances away from the method currently
being executed, backward in time, toward the outermost frame, to
higher frame numbers, to frames that have existed longer. Conversely,
"down" advances toward the method currently being executed, forward in
time, toward the innermost frame, to lower frame numbers, to frames
that were created more recently.
Examining Variables
Debugging often entails looking at the values of variables and objects
to determine when an error has occurred and what may have contributed
to the error. With xxgdb both the value of built-in types (int,
float, char, char*,...) and the values of complicated objects can
be viewed.
The value of a variable or object can be viewed by identifying the
variable or object (see below) and using one of the following
command buttons:
- print
- Print the value of a selected variable or object
- print*
- Print the value of the object the selected variable is
pointing to.
- display
- Display the value of a selected variable in the display window,
updating its value every time execution stops.
- undisplay
- Stop displaying the value of the selected variable in
the display window. If the selected variable is a
constant, it refers to the display number associated
with an expression in the display window.
The value of a variable can be examined in one of several ways. In the
simplest case, the variable is not a pointer and its name is visible
in the Source Window. In this case, simply highlight the name of the
variable in the Source Window and press the "print" button. The value
will appear in the Dialogue/Display window. If the variable is a
pointer to an object, highlight the name of the pointer variable and
use the "print*" command button. The value will, as before, appear in
the Dialogue/Display window. If the name of the variable is not
currently visible in the Source Window you can type its name in the
Dialogue/Display area, highlight the name in the Dialogue/Display
area, and use the "print" or "print*" command buttons as before.
Last Update: September 4, 1995 / kafura@cs.vt.edu