The Start Window |
|---|
 |
The operations defined in the public interface of a class may be applied to any object of that class. Continuing with the example of the Frame class, a Frame object can be created and manipulated as follows:
Frame display("Test Window", 10,20, 100, 200);

display.MoveTo(50, 50);
display.Resize(200,200);
display.Write("Really Neat!", 50,50);
In this example, a Frame object named display is declared. The Frame
constructor method is called implicitly using the arguments provided
in the declaration. These constructor arguments create a Frame
whose upper left hand corner is at location (10,20) and whose height
and width are 100 and 200, respectively.
Once the display object has been constructed, it may be operated upon. In this example, the display object is first moved to location (50,50) using the MoveTo method and then the size of the Frame is changed to a 200 by 200 square shape using the Resize method. Finally the text "Really Neat!" is written in the Frame at the location (50,50) relative to the upper left-hand corner of the Frame.
Notice that the "." ("dot") operator is used to invoke one of the methods of an object. Thus, "display.MoveTo(...)" means to invoke the "MoveTo" method on the object "display". People programming in object-oriented languages often use phrasing like "ask the display object to move itself" to refer to operations being taken on objects. This phrasing reflects the point of view that an object is an entity that is capable of performing certain actions (e.g., a Frame object knows how to move itself to a new location).
Programming with graphical user interface objects - like objects of the Frame class and others that will be introduced later - involves a programming environment that is qualitatively different from that typically seen in introductory programming courses. The difference in the programming environment is due to the fact that graphical user interface systems are event-driven or reactive systems. These terms reflect that the system is "driven" by the occurrence of external "events" (mouse clicks, clock alarms) to which the system must "react". The typical life-cycle of an event-driven or reactive system is:
The program does not "read" its inputs or control when such inputs occur, it simply reacts to their occurrence. Some simple examples are given below using objects of the Frame class as an example.
The events in a graphical user interface system come from two different sources: the user and the hardware clock. In a typical workstation environment the user generates events by moving the mouse, pressing and releasing mouse buttons, or by pressing keys on the keyboard. With other peripheral devices the user might generate events by movements of a joystick, track-ball, or virtual reality devices (gloves, head-mounted displays, etc.). Only mouse events are dealt with in the first, simple programming environment. Timing events are generated by the hardware clock. These events are of interest because they are needed to create animated components of a user interface. A very simple example of this is blinking text that draws the user's attention to an important part of the user interface. For the program to make the text blink, the program must have some idea of the passage of time. A stream or sequence of timer events provides the program with this notion of time.
A simple programming environment will be used that is similar to those found in many object-oriented windowing systems (it is very close, in fact, to the basic model used in the Java Abstract Windowing Toolkit). However, the initial programming environment is not object-oriented itself. As more is learned about object-oriented programming, portions of the environment will be captured in a better object-oriented manner. Eventually, the entire graphical user interface program will be represented as an "application object".
It will be noted that the simple environment lacks a "main" program. Object-oriented languages, including C++, do have a "main" program that defines their initial point of execution and, in many programs, the main program is written by the application developer. However, in a graphical user interface application (and in other applications where a complex run-time library is being used) the main program is more often written by the implementor of the run-time library that provides many of the low-level support functions.
The simple programming environment has four procedures contained in a single file named Program.cc that is shown below. The region outside of the procedures is a global scope in which program-wide objects (such as long-lasting Frame objects) can be declared. This global scope can also be used to define variables that denote the current state of the application. The global objects and global variables can be manipulated inside each of the four procedures. Note that the file's name (Program.cc) is purely arbitrary and has no general significance in C++ or in graphical user interface programming.
Simple Programming Environment |
|---|
|
The OnStart function is called exactly once. This function can be used to initialize any global object and data as well as create the initial display that the user sees. The OnPaint method is called whenever the system suspects that the user's display may have been "damaged" and should be redrawn. Common actions that trigger this function being called are when a window is moved, resized, or exposed to view after being partially, or completely, obscured by an overlapping window. Whenever, within the display area of a Frame object, the user clicks a mouse button or moves the mouse, the OnMouseEvent function is called. This function has input parameters giving the name of the Frame object in which the event occurred, the x and y coordinates of the mouse's current location, and the condition of the mouse buttons. The OnTimerEvent function is called whenever a clock alarm occurs. The role of each of the four functions in the simple programming environment is briefly summarized in the table below.
Summary of Functions in Simple Programming Environment
| |
|---|---|
| OnStart | initialize global objects, global variables, and the user display |
| OnPaint | redraw the user display when needed |
| OnTimerEvent | react to a clock alarm |
| OnMouseEvent | react to mouse clicks and/or mouse movement |
For two reasons, global variables are used in the simple programming environment despite the fact that this seems to contradict the usual (and usually strong and correct) advice to avoid the use of global data. First, the global variables are a temporary expedient. As more is learned about object-oriented programming much, if not all, of the global data will disappear. For the moment, the global data will be tolerated so that experimenting with basic object-oriented ideas can begin. Second, global objects are somewhat less objectionable than global data. At least the object defines an interface that protects its encapsulated data from obvious misuse. Global data has no such protections. Furthermore, in building an association of objects it is not always possible to remove all global data. The objects that form the association sometimes must be defined as global data. By analogy, if an automobile is viewed as an association, it is not possible to conceal some of its constituent parts like the steering wheel, the brakes, and the turn signals.
A program is written in the simple programming environment by providing code for some (or all) of the the four functions defined in the simple programming environment and creating an executable program that uses your definitions of these functions. Providing the code for the four functions is done by editing the file Program.cc. This file must then be compiled and linked with the appropriate run-time libraries. This mechanical step is automated by a make file that is provided. After editing Program.cc, simply type the command "make" (with no arguments). the "make" program will create an executable file named Program. For simplicity, the names "Program.cc" and "Program" cannot be changed.
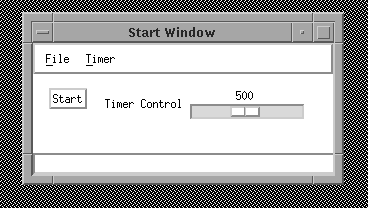
When executed, programs developed in the simple programming environment first display a "Start" window that provides controls for initiating the program, terminating the program, and controlling a simple timer. The "Start" window that is shown in the figure below. When depressed the "Start" button will cause the OnStart function to be called after which the "Start" button will disappear. At any time, the entire program can be terminated by selection the "Quit" item in the "File" menu. The "Timer" menu contains two items for turning on and off a timer (a source of clock alarms). The occurrence of a clock alarm will cause the OnTimerEvent function to be called. The interval of this timer (the duration between alarms) is controlled by the slider bar labelled "Timer Control". The slider and the timer are calibrated in milliseconds. The initial slider setting is at 500 milliseconds (one-half a second). The range of timer settings is between 50 milliseconds (one-twentieth of a second) and 1000 milliseconds (one second). When the timer is running the timer interval can only be changed by stopping the clock, changing the slider position, and then restarting the timer. Changing the slider while the clock is running will not change the timer interval.
The Start Window |
|---|
| |
The "Hello World" program is shown in the table below. This program include "Frame.h" because it uses the Frame class definition to declare a Frame object named window located at position (200,200) on the display and is 400 pixels wide and 400 pixels tall. This window will have a title of "Hello World Program" when it appears on the display. Both the OnStart and the OnPaint functions clear the window object and write the string "Hello World" near the upper left-hand corner of the window.
Hello World Program |
|---|
|
The second program shows how to handle mouse events. In this version
of the Hello World program, the string "Hello World!" is written
wherever in the window the user clicks the left mouse button. The
OnMouseEvent function is called whenever the mouse is moved or a mouse
button is clicked. In this program, the OnMouseEvent function checks to see if
the state of the mouse buttons indicates that the left mouse button is
"down" (i.e., depressed). If the button is down (signalling that the
user clicked the mouse button), the window is cleared and the string
"Hello World!" is written at the coordinates of the mouse event. The
"buttonState" parameter to the OnMouseEvent function is treated as a bit
map. The code
if( buttonState & leftButtonDown)...
simply tests if the bit corresponding to the left button being down is set. If the bit is set, then the mouse button is "down". The item "leftButtonDown" is a value defined in an enumeration given in the file Program.h. Other values are rightButtonDown, middleButtonDown, and isDragging. Also important in this program is the use of state information represented by the variables lastx and lasty that record the position of the last place where the "Hello World!" string was written. It is necessary to keep track of this state information so that the OnPaint function will know where in the window the string should be placed when the window needs to be redrawn. Notice that lastx and lasty are initialized in the OnStart function and updated in the OnMouseEvent function whenever a mouse click is recognized.
Hello World Program with Mouse Events |
|---|
|
The third program illustrates how timer events (clock alarms) are handled. In this program the "Hello World!" string is turned into blinking text by alternately clearing and writing the string on successive timer events. The rate of blinking is controlled by the timer interval. Remember that the timer events will not occur until the timer is turned on using the "Timer" menu in the Start window. Also remember that the slider bar in the Start window controls the timer interval (the time between timer events).
The program uses additional state information, the variable visible to record whether the string is or is not visible at the current time. In addition to the OnTimerEvent, the OnMouseEvent and OnPaint functions use this state inforamtion to decide whether or not to write the string of text in the window.
Hello World Program with Mouse and Timer Events |
|---|
|
The exercises below contain a number of interesting small programs that can be written using the Frame class and the simple programming environment.

|
|

| Exercises |