| |
| |
| Chapter 3. Methodology | ||||||||||||||||||||||||||||
|
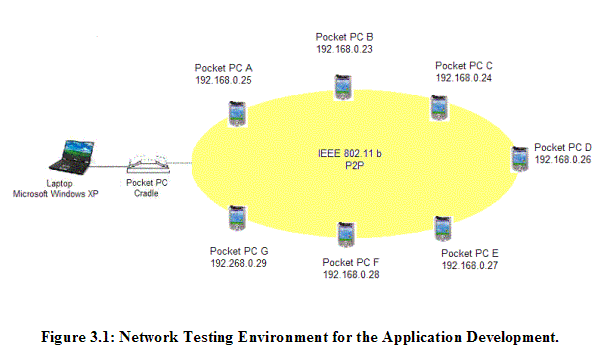
This Chapter describes the methodology for the implementation our multi-hop ad hoc instant messenger application using Pocket PCs and IEEE 802.11b. 3.1 ENVIRONMENT OF THE APPLICATION DEVELOPMENT 3.1.1 Network Testing Environment
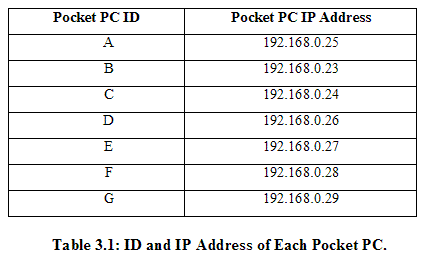
Figure 3.1 shows the network environment for our application development, modified based on Yes independent study project done at Virginia Polytechnic and State University in Fall 2002 [Ye2002]. Ye previously worked on this ad hoc messenger project. As Figure 3.1 shows, in our network environment for the application development, any access point or any other infrastructures are not required to set up the wireless ad hoc network. The compiled final executable files can be installed on the Pocket PCs through Microsoft ActiveSync and a cradle, either using a serial port or USB port. Multiple Pocket PCs can be synchronized with the laptop through setting up a partnership. During the experiments, Pocket PCs communicate with each other through the Compaq wireless WLAN cards 802.11b P2P capability. The total number of participating Pocket PCs in this wireless ad hoc network is 7. For the convenient use of Pocket PCs, each Pocket PC is named and its IP address is assigned manually as follows:
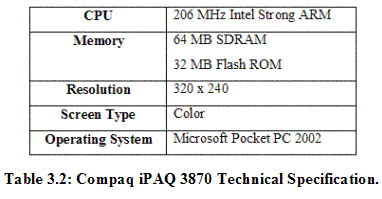
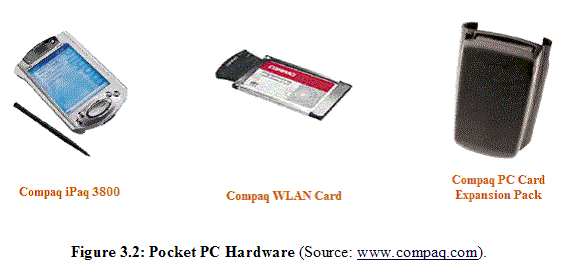
3.1.2 Software Components The development software components are as follows: For the Application Development: Remote Control Display: Tool to obtain screen shots for the user interfaces of developed applications. Downloaded from ZedGraph: Graph Class Library in C#. Tool to draw graphs in the Statistical Analyzer that is an application developed for generating result graphs according to a set of selected x and y parameter. Downloaded from http://www.codeproject.com/csharp/ZedGraph.asp. 3.1.3 Hardware Components The development hardware components are as follows: 1 Toshiba Satellite Mobile Intel® Pentium® 4 M CPU 2.00GHz, 496 MB of RAM: Main development environment. 7 Compaq iPAQ 3870: Targeted platform 7 WL 110 11 Mbps Wireless LAN PC Card: Wireless network for P2P communication 7 Compaq Dual Slot PC Card Expansion Pack: Connect a Pocket PC with a WLAN card The following is the main technical specification of Compaq iPAQ 3870 Pocket PC:
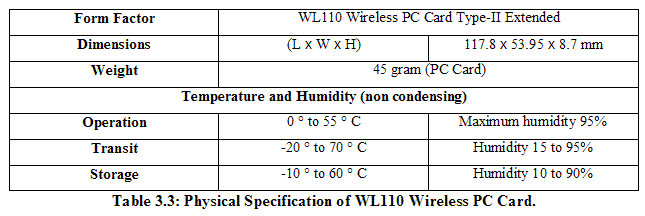
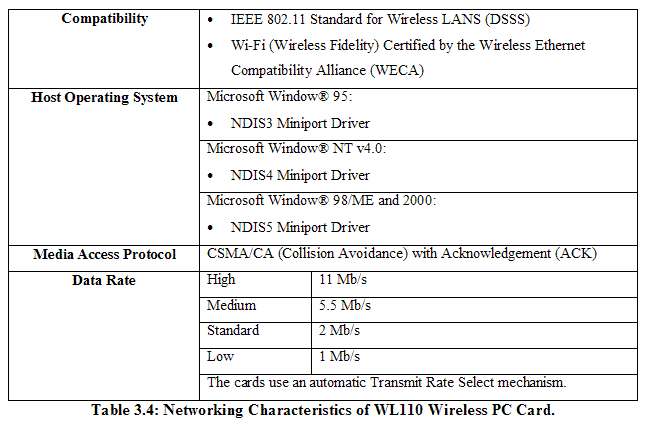
The Compaq WL 110 Wireless PC card [Compaq2001] has the following specifications:
The range of the wireless signal is associated with the Transmit Rate of the wireless communication. Communications at lower Transmit range will travel larger distances [Compaq2001].
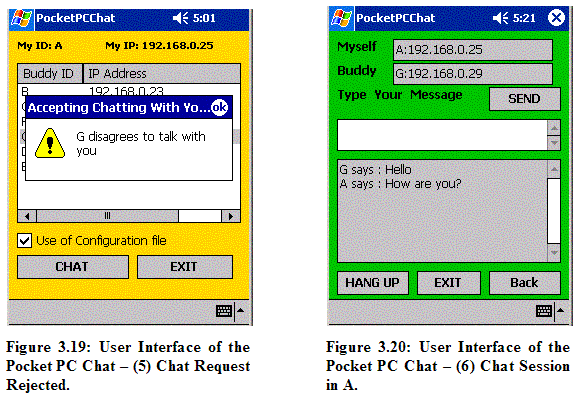
3.2.1 Basic Implementation of Client and Server Our main tool to develop this multi-hop ad hoc instant messenger is Microsoft .Net Compact Framework 2003 in C#. In C#, the UdpClient class is used to create a Client and a Thread is created as a Server to listen to arrivals of packets. The Client handles all the client functionalities including sending packets. UDP is chosen to send and receive packets, and its size is set to 512 bytes. 3.2.2 Implementation of the DSR Protocol TThis Section describes the features of the DSR protocol [Johnson2001] implemented in our ad hoc messenger application. 3.2.2.1 Initial Route Discovery The initial Route Discovery process uses the same procedures as the regular Route Discovery process. In our application, the following packets are used for the initial Route Discovery: Start Chat Packet (SCP): This packet is broadcast to all neighbors by a source to find a new route. When this packet reaches a destination node, the destination node will be asked to join the conversation with the source node. Accept Start Chat Packet (ASCP): This packet is sent from the destination node to the source node when the destination node agrees to chat with the source node. In the normal Route Discovery process, this packet takes the role of an acknowledgement (ACK) packet to the Start Chat Packet. Reject Start Chat Packet (RSCP): This packet is sent from the destination node to the source node when the destination node disagrees to chat with the source node. When this packet is received in the source node, the chat session will be stopped. In the normal Route Discovery process, this packet acts as an ACK to the Start Chat Packet.
When the destination node agrees to chat with the source node, all routes found through the initial Route Discovery packets (Start Chat Packets) will be stored in the sources cache. When the current route is broken, the source will try alternative routes in its route cache to retransmit the data packet. Only when there is no alternative route available in the route cache of a source node, will a new Route Discovery be performed. The new Route Discovery process is described in more details in the following subsection.
3.2.2.2 Data Packet Transmission After the initial Route Discovery is done and a chat session begins, the source node or destination node can transmit data packets containing conversation contents by using the following packets: Data Packet (DP): This packet includes conversation contents in its payload. A data packet can be sent only when a route is found. A data packet contains a route in its header. An intermediate node will just look up the route contained in the data packet, and then forward the data packet to the next node. When the source node sends a data packet, a copy of the data packet is stored in the Send Buffer of the source node. This copy of the original data packet is deleted when an ACK for the data packet is received from a target node. Route Reply Packet (RRP): This is the reply packet (ACK) for a data packet. After the source node sends a data packet, the destination node will send a Route Reply Packet (RRP) to the source node as an ACK. The destination node uses the reverse path of the route contained in the data packet to send a RRP. Also, when the destination node receives a data packet from the source node, if the data packet is received out of order, it saves a copy of the received data packet in the Receiver Window Buffer with an ordered sequence number to receive and display data packets in order. By default, Sliding Window Size (SWS) is 1. That is, a stop-and-wait policy is used. Thus, only after a RRP is received in the sender, will the next data packet be transmitted. For the more general case that SWS is larger than 1, a data packet (which is not a data packet with the next sequence number that the destination node expects to receive) may be received out of order by the receiver. In this case, the receiver stores the out-of-order data packet received in its Receiver Window Buffer, and waits until the next data packet with the expected sequence number is received. After missing data packets (if any) have arrived, the destination node will display the chat content in order followed by the removal of these data packets from the Receiver Window Buffer. Therefore, users are guaranteed to see chat contents in the same order as the sender transmits. When the source node receives a RRP, the copy of data packet stored in the Send Buffer is removed. Note that the use of SWS of various sizes is a design alternative to be evaluated in the thesis. Timeout for Two End-To-End Nodes: There is a timeout period between the source and destination nodes, which is set as 5 seconds. In our application, a one-way latency for delivering a data packet between two nodes was 0.4 second and the round-trip latency was 0.8 seconds on average. Since we have 7 nodes (Pocket PCs) in our experiments, the timeout in the worst case (i.e. A-B-C-D-E-F-G) needs to cover 12 hops. Thus, we decided to set the end-to-end timeout period as 5 seconds (12*0.4 second = 4.8 seconds). The source node will wait for the end-to-end timeout period after it sends a data packet to the destination node. If the source node does not receive any ACK (through a Route Reply Packet) from the destination node within the end-to-end timeout, it will retransmit the same data packet. This process repeats three times, after which the source will conclude that a route error has occurred and will enter a Route Maintenance stage. In the next Section, we explain how a broken route is repaired in the Route Maintenance stage. 3.2.2.3 Route Maintenance
Receipt Packet (RP): This packet is used to ensure that a data packet is received in the next node safely. That is, a Receipt Packet is used as an ACK between two neighbor hops . Specifically, after a node forwards a data packet to the next node, if it does not receive a receipt packet from the next node within a hop-by-hop timeout period (1 second), a node would consider that the link is broken or the next node has failed. Any intermediate node detecting such an error will inform the source node by means of a Route Error Packet (REP), after which the source node will perform a route repairing process (to be explained later). Receipt packets are used only when data packets are sent. The use of receipt packets is a design alternative to be evaluated in the thesis. Route Error Packet (REP): This packet is used by an intermediate node to inform the source node of a route error. After the source node receives a REP, the route in use is considered not valid any longer and will be removed from the sources cache. Then, the source node invokes a route repairing process to repair the broken route. Route Repairing Process: A route repairing process includes two route-repairing mechanisms. First, when there is any alternative route available in the route cache of a source node, the source node will use the route to resend the lost data packet (the source has not received an ACK for the data packet sent from the target) until there is no more available route in its route cache. If any of alternative routes works fine by receiving an ACK for the retransmitted data packet, the route will be used continuously to send subsequent data packets. Second, if there is no alternative route available in the route cache of the source node, the source node will perform a Route Discovery to find a new route. More details of Route Discovery stage will be explained later. 3.2.2.4 Use of Route Cache Structure
Route Cache: A route cache is used to store all available routes from a source node to a destination node. When a Route Discovery is initiated, a Route Discovery packet is broadcast by the source node. Since there may be more than one route between the source node and the destination node, the source node may receive multiple route discovery reply packets from the destination node, in which case the source node stores all available routes in its cache. When the source needs to find a route to deliver data packets, it uses the shortest route among all routes it maintains in its cache. The use of cache structure is a design alternative to be evaluated in the thesis. 3.2.2.5 Route Discovery The Route Discovery is performed when initially there is no route available, or there is a route error detected and no cached route is available. The following packets are employed to perform a new Route Discovery in repairing a broken route when no cached route is available.
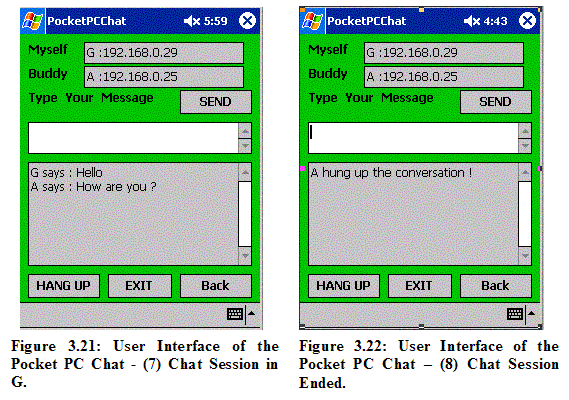
Route Discovery Packet (RDP): This packet is used by a source node to find a new route. This Route Discovery Packet (RDP) is flooded to all neighbors of the sender. An intermediate node, who does not find itself in the route record of the RDP and is not the destination node, will rebroadcast the RDP to its own neighbors. Finally, when the target node receives the RDP, it stores the accumulated route record (the route found by the RDP) in its route cache, and replies to the initiator of the RDP by sending a Reply Route Discovery Packet (RRDP) as an ACK. Reply Route Discovery Packet (RRDP): When a target node receives a RDP, it uses the reverse route of the route record contained in the received RDP to send a Reply Route Discovery Packet (RRDP) as an ACK to the source. Once the source receives the RRDP, it saves the route contained in the RRDP in its route cache. 3.2.2.6 Hang-Up The Hang-Up stage is the final stage when a chat session is ended. The operation of Hang-Up Packet (HUP) and Reply Hang-Up Packet (RHUP) is the same as Data Packet (DP) and Route Reply Packet (RRP). The following packets are utilized as follows: Hang-Up Packet (HUP): This packet is sent when a user wants to end a chat session. In our prototype ad hoc chat program (UserChat), after a Hang-Up Packet (HUP) is sent, the interface is brought back to the first screen that contains the buddy list to start a new chat session with a new buddy. After the buddy user receives this packet, she or he will see the message that the source buddy ends this chat session. Then, the buddy also goes back to the buddy list screen to start a new chat session with a new buddy. Reply Hang-Up Packet (RHUP): This packet is an ACK for a HUP. When a source node sends a HUP to its buddy in the chat session, the destination buddy node returns a RHUP to the initiator of the HUP. After then, the destination buddy node is reset to the beginning state. Also, after the source node receives a RHUP from its buddy destination node, it is also reset to the beginning state. Therefore, when any node wants to start a new chat session with any other node, a new route should be established because all nodes in the ad hoc network do not hold any route information obtained from the previous sessions at the beginning. 3.2.2.7 Other Components
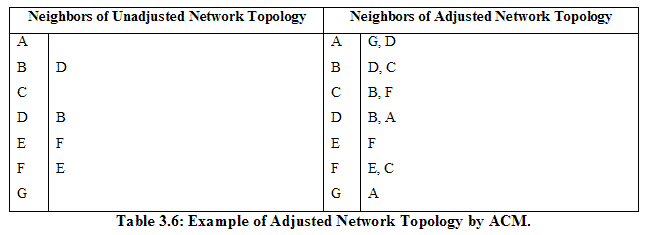
Sliding Window Size (SWS): The SWS parameter is used to specify a Sender Window Size and a Receiver Window Size. We set Sender Window Size and Receiver Window size to be of the same size specified by the SWS parameter. By default, SWS is 1 representing the stop-and-wait policy [Peterson2000]. In this case, a source node cannot send the next data packet until it receives a Route Reply Packet (RRP) as an ACK from the destination. One of our experiments will measure the effect of SWS on the performance of our application. In that experiment, SWS varies between 1 and 6. All nodes are Connected with Multi-hops (ACM): In our experiments, we simulate movements of nodes in the mobile ad hoc network using the Random Waypoint Model (RWM) and generate a dynamic topology configuration file (conf.xml) as a function of time to be followed by all nodes in a single simulation run. In some cases, the dynamic network generated may partition a node from all other nodes. That is, there may be cases in which there is no route between a source and destination as time progresses, which makes it difficulty to test the effectiveness of Route Discovery and Route Maintenance mechanisms in DSR and design alternatives used to implement our instant messenger application. Therefore, we allow the ACM selection option by which a route always will exist to connect two nodes at all times despite movements of nodes in the network. Two rules are used to achieve the condition. First, all nodes are connected without any node being isolated from the network. During the generation of a dynamic topology configuration file, if we find a node is being isolated from the network, we force it to connect to some neighbor nodes. In that case, a node having the smallest number of neighboring nodes among all participating nodes is selected to connect with the isolated node. Second, all nodes should be connected with multi-hops. This is implemented by limiting the number of neighbor nodes around each node not to exceed one half of the participating nodes, i.e., 3 (7/2 = 3 as an integer) in our experiments. Therefore, when a node is connected with more than one half of the participating nodes, we artificially remove some links around it, starting with a node having the largest number of neighbors. In short, in order for all nodes to be properly connected through multi-hops, ACM modifies the network topology by forcing an isolated node to be connected, and a node having too many neighbors to cut some of its links. Table 3.6 shows an example of unadjusted and adjusted network topologies generated at a time instant based on the random waypoint model (GEN application) with speed = 80 m/s and pause time = 0 second for the case in which the range for wireless transmission is 40 m, the simulation area is 200m (height) by 200m (width), seed is 3, and the total number of participating nodes is 7.
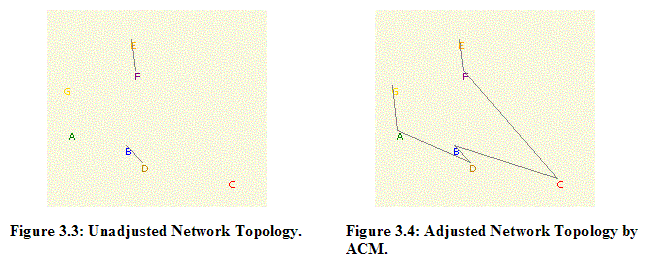
Figures 3.3 and 3.4 show network topologies for both unadjusted and adjusted network topologies obtained from the GEN application based on the Random Waypoint Model (RWM), corresponding to Table 3.6.
3.2.3 XML-Based Packet Components This Section illustrates each component of a packet used in our multi-hop ad hoc instant messenger. 3.2.3.1 Regular Packet Format The regular packet format is used for communication between a source node and a destination node. A regular packet contains 10 fields (or components) as follows:
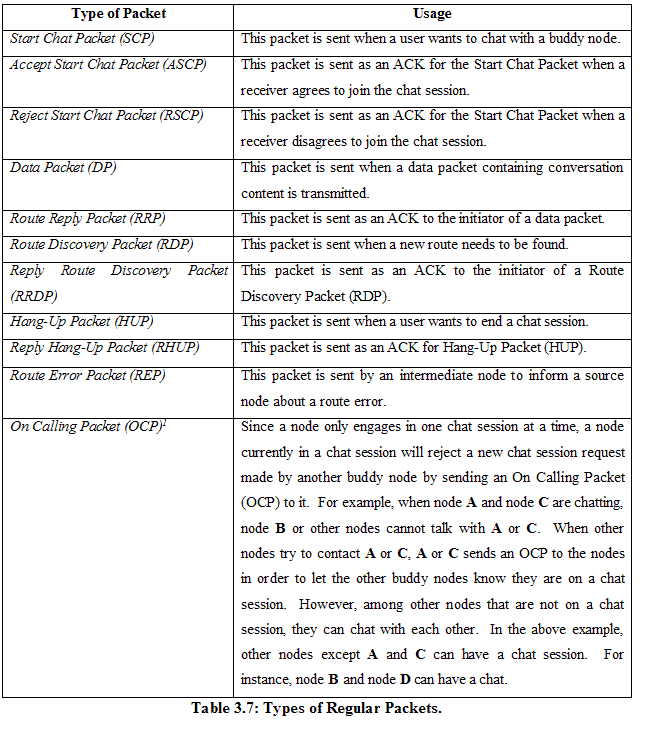
Type: Type of packet. There are 11 types of packets used in our application using the regular packet structure, as shown in Table 3.7.
Note: On Calling Packet Initiator: Sources ID. Target: Destinations ID. Request ID: Unique ID to distinguish each packet. The Request ID is comprised of a four-tuple as follows: < Session Number, Source ID, Destination ID, Sequence Number > Session Number: Randomly selected unique number to distinguish each chat session. Route Record: Historical record of route, which is passed from a source to a destination node, as explained in the previous chapter regarding the description of the DSR protocol (Chapter 2). From the source node to the destination node, the previously traversed nodes ID is accumulated to the Route Record slot. For example, if there is a route from A (source) to E (destination) such as A-B-C-D-E in the Route Discovery stage, the Route Record slot will be added with A in a source node, A: B in node B, A: B: C in node C, A: B: C: D in node D, and A: B: C: D: E in node E. By doing this, node E will have a complete path from A to E and can send an ACK by using the reverse route of the Route Record back to the initiator of Route Discovery packet, E: D: C: B: A in this example. Current ID: Current nodes ID. This information is used when a receipt packet is sent to the previous node. Payload: Conversation content in a data packet. Route Cache: Route obtained from the Route Cache of a source node. If a cached route is available, a source node adds the cached route in this Route Cache slot of a data packet. Since this slot includes a whole path from a source to a destination, intermediate nodes just can forward a data packet to the indicated next node based on this Route Cache information. Route Cache returns the shortest route whenever a node requests a route. Receipt ID: ID for Receipt Packet to differentiate each receipt packet from all incoming receipt packets. This Receipt ID is used to remove timeout condition for each receipt packet. The Receipt ID consists of a three-tuple as follows: < Current Node ID, Next Node ID, Unique Integer Number> Unique Integer Number: This number is randomly selected, but does not overlapped with already selected number used in Receipt ID to distinguish each receipt packet. Time Stamp: Time at which a sender transmits a packet. 3.2.3.2 Receipt Packet Format The Receipt Packets are used for hop-by-hop packet delivery confirmation. Three fields are used as follows: Type: Receipt Packet Receipt ID: Same as Receipt ID in a regular packet. Time Stamp: Time at which a sender transmits a packet. 3.2.3.3 Examples of a Regular Packet and a Receipt Packet in XML Format
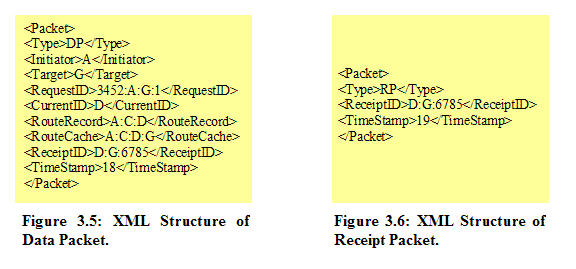
Figure 3.5 shows an example data packet in XML format. The packet type specifies that the packet is a data packet. The Request ID field indicates that 3452 is the session ID of the chat session, the source node is A, the destination node is G, and the packet is the first data packet with a sequence number of 1. The current node is D and the current route record is updated to include the current node in the partial route found. The Route Cache field indicates that the previously Route Discovery process has found a new route A-C-D-G. Thus, this data packet will be forwarded to G based on the information of Route Cache. The Receipt ID field is used to indicate that D should receive a receipt packet from the next node, G. The time at which node D sends this packet to G is at T=18 seconds, which is the time elapsed since the session begins. Figure 3.6 also illustrates the structure of a receipt packet in XML format. This receipt packet is for packet delivery confirmation between D and G in which 6785 is a unique integer number to distinguish each receipt packet. The time at which node D sends this receipt packet to G is at T=19 seconds, as indicated in the Time Stamp field. 3.2.4 Network Topology Design Since the actual testing environment for an ad hoc network is difficult to set up, the Random Waypoint Mobility Model has been employed to pre-generate a dynamic network topology as a function of time for nodes to follow in a simulation run. This Section gives a brief overview of the Random Waypoint Model and describes how our GEN application generates simulated network topologies based on different input values. 3.2.4.1 Random Waypoint Mobility Model The Random Waypoint Mobility Model contains pause time between changes in direction and/or speed [Camp2002b, Bettstetter2003]. Once a Mobile Node (MN) begins to move, it stays in one location for a specified pause time. After the specified pause time is elapsed, the MN randomly selects the next destination in the simulation area and chooses a speed uniformly distributed between the minimum speed and maximum speed. Then, the MN continues its journey toward the newly selected destination at the chosen speed. As soon as the MN arrives at the destination, it stays again for the indicated pause time before repeating the process [Camp2002b]. Camp et al. give a demonstration of an example traveling pattern of an MN generated by the Random Waypoint Mobility Model, as shown in Figure 3.7 [Camp2002b]. The pattern starts at a randomly selected point (133, 180) with the speed of the MN uniformly selected from 0 m/s to 10 m/s.
When MNs move based on the Random Waypoint Model, there is a complicated relationship between node speed and pause time [Camp2002b]. For instance, a scenario with a higher speed and longer pause time generates a more stable network than a scenario with a lower speed and shorter pause time. Long pause times, for example over 20 seconds, generate a stable network topology, such as few link changes per MN, even at high speeds, as demonstrated in Figure 3.8. In other words, even though speed is very high, if pause time is over 20 seconds, this random waypoint model produces a very stable network. Thus, in order to set up the very fluctuating network scenario by mainly controlling speed, high speed and very short pause time like 0 second are required.
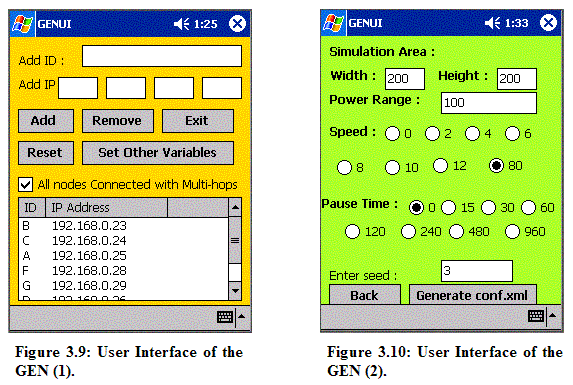
3.2.4.2 GEN Application We developed a GEN application to generate a dynamic topology configuration file to be followed by all nodes based on the random waypoint mobility model. This Section discusses how GEN creates a configuration file to simulate a dynamically changing network and describes how we use XML to describe the configuration file (output of GEN) and the basic information file (input to GEN). 3.2.4.2.1 User Interfaces of the GEN Application The GEN program is to be loaded in each Pocket PC. According to the scenario of each experiment, the same configuration file will be loaded in each Pocket PC. The following shows the user interfaces of the GEN program:
Figure 3.9 is the first user interface we can see when the GEN program is loaded. A user can add or remove or reset a nodes ID and IP address. After appropriate information is added and the user wants to set other variables, such as a simulation area, power range, speed, and pause time, etc., the user may click the button named the Set Other Variables. The Set Other Variable button brings the second interface shown in Figure 3.10. Simulation area and power range (transmission range) can be entered manually. A user can also manipulate speed and pause time. The specified pause time and speed will be applied to all randomly selected destinations, which are randomly selected positions within the chosen simulation area.
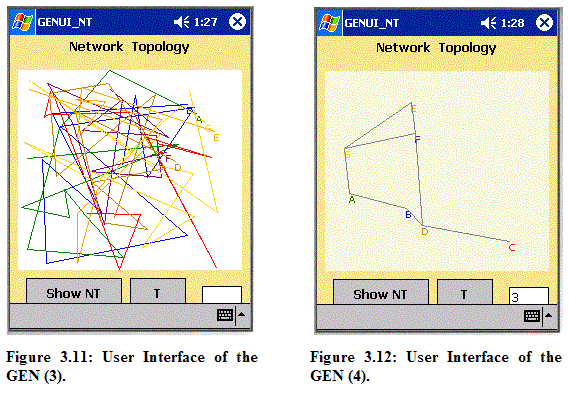
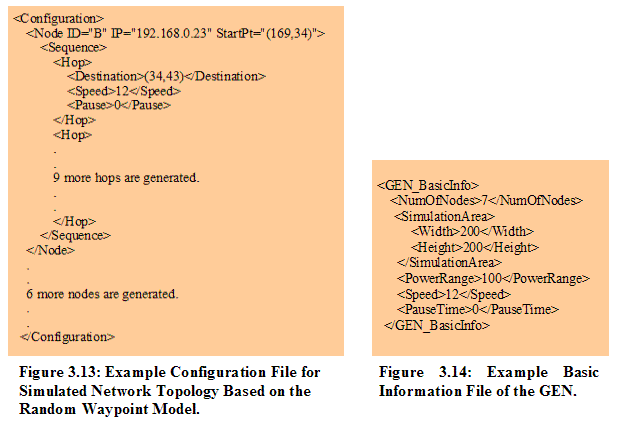
After proper input values are chosen, the Generate conf.xml button shows the third interface, illustrated in Figure 3.11. Figure 3.11 shows the moving pattern of each mobile node based on the random waypoint model. The forth interface of the GEN program in Figure 3.12 demonstrates network topology at a specified time (T) equal to 3 seconds, which means that 3 seconds are elapsed since the session begins. Also, ACM is used for all nodes to be connected with multi-hops as a default condition. 3.2.4.2.2 Network Configuration File in XML Format The network configuration file (conf.xml) will contain randomly selected 10 destination positions (i.e. (x, y)) each with speed and pause time. Instead of selecting each random destination whenever each node moves as explained in Section 3.2.4.2 based on the Random Waypoint Mobility Model, 10 destination positions are pre-generated. After each node moves all 10 destinations, then it returns to the first destination and continues to move to the next destination. As explained in the User Interface of the GEN Application in previous subsection, a user can manipulate speed and pause time in the configuration file. Each node (Pocket PC) will see the same configuration file and move in the same simulated network. In the simulated network, each node stays at one destination location for specified pause time, and then moves to the next destination location with the specified speed. Since our experiments will be implemented based on various speed and pause time, a user can control speed and pause time by entering them as input values. Figure 3.13 shows an example network configuration file in XML format based on the random waypoint model. This configuration file is generated by the GEN application. Appendix C.1 gives a true example of the network configuration file (conf.xml).
3.2.4.2.3 Basic Information File in XML Format
To describe the input parameter values to the GEN application, another XML file is generated based on the chosen input values from the second interface shown in Figure 3.10. 3.2.5 User Interfaces of the Chat Application The DSR protocol is implemented in our prototype ad hoc messenger (UserChat) with the following default conditions:
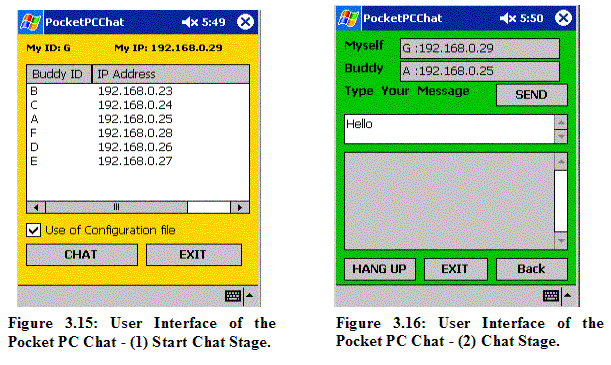
Note that the use of the configuration file for simulating a dynamic network topology can be on or off based on the users preference in the real chatting prototype. The prototype application of multi-hop ad hoc messenger using Pocket PCs has the following two user interfaces:
Figure 3.15 shows the first interface a user sees when the application is loaded. The Buddy List displays IDs and IP addresses of all other participating nodes except its own. Figure 3.16 is the second interface when a chat session begins.
A use scenario is as follows:
3.2.6 Design for the Automatic Data Collection Application
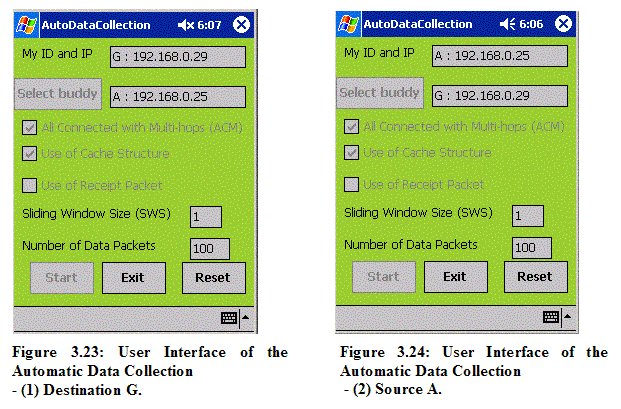
To facilitate automatic data collection, another version of the wireless ad hoc messenger application is created. The underlying design and implementation is exactly the same as the prototype ad hoc messenger discussed earlier except that it is augmented with automatic testing and data collecting capabilities. The Automatic Data Collection application provides a user interface to allow a tester to specify scenario conditions. Figures 3.23 and 3.24 illustrate a use scenario:
Figures 3.23 and 3.24 show snapshots of the user interface provided by the Automatic Data Collection application. More detailed user interfaces for the Send And Receive Files and Statistical Analyzer for achieving wireless file transfer and analysis of result files are listed in Appendix B.1 and Appendix B.2, respectively.
3.3 PERFORMANCE EVALUATION: INPUT PARAMETERS AND METRICS This Section describes input parameters to both the GEN and Automatic Data Collection applications, and defines performance metrics to evaluate the performance of our wireless ad hoc messenger application. 3.3.1 Input Parameters
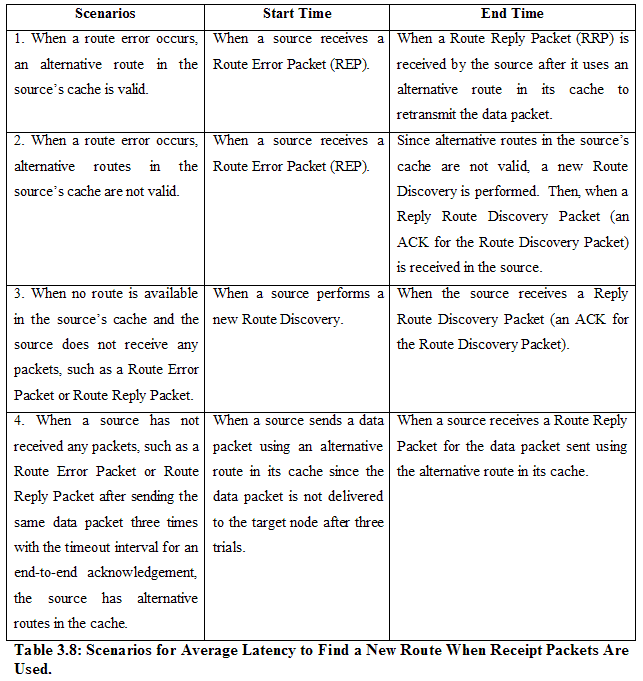
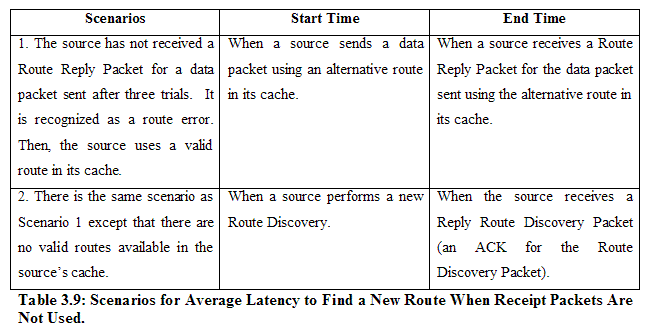
For the GEN Application: Pause Time: In the random waypoint model, each node stays at a location for a pause time period. Our application uses the following values to manipulate pause time: Speed: In the random waypoint model, each node moves to a next location with a specified speed. Speed can be selected in our application among the following values: Simulation Area: The network area for each nodes movement can be entered manually. The width and height of the simulation area should be specified. The default simulation area is 200m (Width) by 200m (Height), which is equal to 40,000 m². Power Range (Transmission Range): Within a single-hop transmission range, nodes are connected with each other. This value can be entered manually. The default power range is 100 m. Seed: We use different seeds to generate different topology configuration files. We also conduct each experiment for a specific scenario three times (three rounds) to observe statistical variances, so each experiment uses three different seeds to generate three different configuration files. For the Automatic Data Collection Application: ACM (All nodes are Connected with Multi-hops): On or Off Use of Cache Structure: On or Off Use of Receipt Packets: On or Off Total Number of Data Packets to Send: Can manually enter. The default value is 100. SWS (Sliding Window Size): Can manually enter. The default value is 1. 3.3.2 Metrics Used We select five metrics to evaluate the performance of our wireless ad hoc messenger, namely, average latency to find a new route, average latency to deliver a data packet, delivery ratio of data packets, normalized control overhead, and throughput. 3.3.2.1 Average Latency to Find a New Route This metric indicates the average delay experienced to find a new route. This metric is chosen to measure the performance of our application because a short delay to find a new route in the presence of dynamically changing network topologies is a good indication that our application functions well. There are two situations to estimate the average latency to find a new route, as summarized in Table 3.8 and Table 3.9:
3.3.2.2 Average Latency to Deliver a Data Packet
This metric indicates the delay experienced to successfully deliver a data packet from a source to a destination. This metric is selected also because it measures how our application functions under dynamically changing network topologies.
3.3.2.3 Delivery Ratio of Data Packets This metric indicates how many data packets (including retransmission due to errors) are transmitted in order to deliver the same number of data packets. For example, when there are 10 data packets to be delivered but 20 data packets are actually transmitted, then the delivery ratio is 50% since 10 data packets are transmitted but not delivered. This data delivery ratio is selected also to measure the performance of our application when the topology is rapidly changing causing links to be broken easily. This metric is defined by the following function:
Delivery Ratio of Data Packets = 3.3.2.4 Normalized Control Overhead This metric represents how many control packets are transmitted per data packet delivered. Since constrained resources are an issue in an ad hoc network, using fewer control packets per data packet is desirable to help reduce the use of bandwidth, battery power of each mobile device, etc. The normalized control overhead is computed by the following formula:
Normalized Control Overhead = Control packets are used for Route Discovery and Route Maintenance. Examples of control packets are Route Reply Packet, Route Error Packet, Start Chat Packet, Accept Start Chat Packet, Reject Start Chat Packet, Route Discovery Packet, Reply Route Discovery Packet, Hang-Up Packet, and Reply Hang-Up Packet. We do not consider receipt packets as control packets because they are just used for hop-by-hop delivery confirmation. In a simulation experiment, we collect control packets sent by each node in order to avoid double counting. 3.3.2.5 Throughput This metric shows how many data packets are delivered per time unit (second). It is used to measure the degree of parallelism allowed by the system to handle the delivery of multiple data packets simultaneously. The throughput is calculated as follows: Throughput = Total number of data packets delivered / Total time elapsed. The total time elapsed starts when the first Route Discovery packet (Start Chat Packet) is sent and ends when the ACK of the last data packet (Route Reply Packet for the last data packet sent) is received by the sender. When the throughput is high, it means that more packets can be transmitted per second or less time will be spent to deliver a fixed number of data packets. 3.4 XML FILES USED FOR DESCRIBING RESULTS OF EXPERIMENTS
There are three XML files used to describe experimental results from the Automatic Data Collection application as follows: ADC_basicInfo.xml, Result_(NodeID).xml, and DataAnalysis_(NodeID).xml.
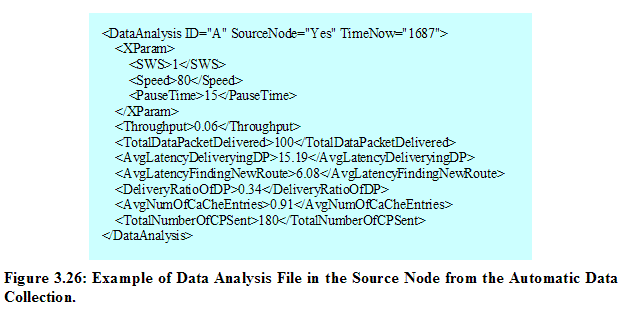
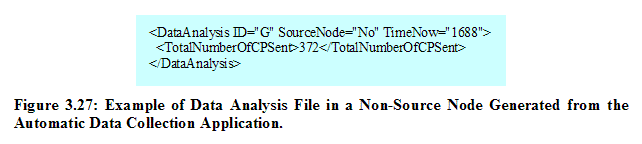
Figure 3.26 displays an example file of DataAnalysis_A.xml generated from the Automatic Data Collection application. This source nodes file is mainly looked up by the Statistical Analyzer application in the laptop to produce proper result graphs according to a set of selected x-parameter and y-parameter. An example file in a non-source node is given in Figure 3.27.
As most information needed for data analysis can be obtained from the source node except the total number of control packets sent, the files from non-source nodes do not have to contain all other information like components of the file from the source node. However, since the total number of control packets sent should be collected from all nodes participating in the network, it is recorded in each DataAnalysis_(NodeID).xml even for non-source nodes.
Figure 3.28 shows an example file of Result_A. xml that includes the history of all packets sent and received by the source node. This file is used as a sanity check that all processes are functioning properly based on the design of the DSR protocol in our application. As illustrated in Figure 3.28, each result packet consists of 7 fields as follows: Not Transmitted DP: Data packet that is not transmitted yet. This field is used to measure latency to find a new route when the current packet type is Route Discovery Packet or Reply Route Discovery Packet or Route Error Packet.
This Chapter detailed the methodology used for the design, implementation and evaluation of the wireless ad hoc messenger application using Pocket PCs based on the DSR protocol.
In Chapter 4, experimental results will be presented and analyzed in terms of the five selected performance metrics. |
||||||||||||||||||||||||||||
|
Last
updated:
Thursday, July 29, 2004
|
||||||||||||||||||||||||||||